Tuesday, November 24, 2009
Happy Holidays!
Just a quick note to say M & I are going off on our holiday! Will be back in my Cozy Little Kitchen soon...until then, Happy Holidays! Hope your days ahead are filled with joy, cheer, love and laughter.
Monday, November 9, 2009
And Thus the Recipe was Born...

Here's one of those recipes that I came up with. A lonely bag of baby carrots in my fridge was the only fresh veggies at hand, so had to build a substantial menu with it :) I also had half a bag of frozen peas and voila! Carrot 'n' Peas Rice was made for lunch! A quick whip of onion and tomato raita, and we were in business.

- 1 cup basmati rice (washed and drained)
- 1.5 cups grated carrot
- 1/4 cup frozen green peas
- 1 small onion, sliced
- 1/4 tspn saunf (fennel) and jeera (whole cumin)
- 1 tbspn ghee or oil
- masala powders, 1/2 tspn each - turmeric, red chilli powder, anardana powder (pomegranate powder) and a pinch of garam masala.
- 2 cups water
- salt to taste
- Heat ghee in a pot and tip in saunf and jeera. Saute for a few seconds.
- Put in sliced onion and saute till done.
- Add ginger garlic paste and stir for a few minutes.
- Now throw in the grated carrot, peas and rice and stir gently until the rice is well coated with everything and turns kind of an opaque white.
- Pour in 2 cups of water and stir well.
- Add all the masala powders and salt.
- Give it a good final stir and cook on medium heat until most of the water is absorbed.
- Then reduce to a simmer and cook covered until all the water is absorbed.
- Serve hot with raita.
Monday, November 2, 2009
Paneer Paratha
Paneer is Indian cottage cheese. I love it's texture and the fact that it is so versatile makes it a popular ingredient in most Indian pantries (well, refrigerator!). It can easily be made at home, although I've never tried it once! I've seen videos of it being made on YouTube and have always wanted to try, but somehow the simpler option of getting a pack from the supermarket always wins the vote. There are tons of recipes with paneer, both savoury and sweet. I thought I'd post this recipe for paneer parathas as we had them for lunch yesterday. A friend of ours had made it for us once long ago and I tried it at home the very next day. It turns out really well and tastes very good. It's a great option when you don't want to make the usual rice 'n' dal or roti 'n' gravy, 'cos all you need to serve it is yogurt and pickle.
 Now, the paneer is the star of the recipe. You've got to have the real deal - a block of good firm paneer. Yes, you could substitute it with cottage cheese, but no, you cannot use the cottage cheese spread thingy. This we learnt the hard way at our friends' place the other day. We thought we were smart and could get away with using the cottage cheese spread and I just have three simple words - IT DIDN'T WORK! But I did learn one thing though, we are glad to have such sweet friends who did not fuss and complain about the disastrous looking 'thing' that resulted but tolerantly ate it all. And thank God for small mercies, we were all fine the next morning!
Okay, so I was saying - firm paneer or cottage cheese, if you don't have it, make something else for lunch. Simple :)
Parathas are stuffed unleavened Indian breads.
Here's the recipe -
For the dough -
- 2 cups wholemeal flour
- enough water to knead into a soft dough
- salt to taste
- 1/2 a block of fresh paneer
- 1 small onion, finely chopped
- 1 tspn ginger-garlic paste
- 1/4 cup chopped coriander
- about a 1/4 tspn of - turmeric powder, cumin powder (jeera powder), amchur powder, red chilli powder (use more if you prefer it hot)
- salt to taste
- Make a soft pliable dough with the wholemeal flour. Cover and let rest for about 15 mins.
- In a large bowl, crumble the block of paneer, add all other ingredients and give it a good mix.
- Roll out the stuffed parathas as seen in the video.
- Slap it on to a hot skillet and cook on both sides with a generous smear of ghee.
- Serve hot with yogurt and pickle.
Sunday, November 1, 2009
Thankful you were born!

It was M's birthday yesterday, yay! But poor him, he was working all day :( He had been really busy the whole weekend and so there wasn't anything special planned for his special day. I thought I'd make something sweet to say 'thank you' to God for making him especially for me :) So I made kesaribhath/suji ka halwa/shira. It's really simple, gets done in a jiffy and tastes great. Here's the recipe -
1 cup semolina (rava/sooji)
3/4 cup sugar
2 cups milk
2 tbspns ghee
1 small banana, chopped
a pinch of cardamom powder
a handful of raw cashews and sultanas
- Heat about 1/2 a tbspn of ghee in a non-stick wok/pan. Roast cashews and sultanas until the cashews turn a light brown. Remove and keep aside.
- With the ghee in the wok, tip in the semolina and roast until light brown and toasty.
- Meanwhile heat the milk on HIGH in a microwave for about a minute. You could even heat it on the stove top.
- Once the semolina is roasted, turn down the heat to low and pour in the hot milk. Please be very cautious as you do so - apparently the roasted semolina and hot milk are long lost friends who get really excited when they see each other! Jokes apart, the hot steam from the hot milk and the hot wok (wow! that's a lot of 'hot')...so please be careful, don't burn yourself!
- Keep stirring to avoid lumps. The idea is to cook the semolina in the milk and it happens quite quickly, in about 2 minutes.
- When the mixture kind of begins to turn dry, add the sugar.
- As you mix everything, you'll notice that the mixture begins to turn liquid-ey again. Now work quickly and throw in all the other stuff - chopped banana, cashews and sultanas, cardamom powder and the remaining ghee.
- Stir it for a couple of minutes until it all amalgamates well and turn off the heat.
- Serve hot!
I'd earlier posted a recipe for kesaribhath, but I'd made it with chopped pineapple and it's a slightly different recipe in that I used water instead of milk.
So, no fancy cake or cocktail party snacks for M's special day this year, just a humble and yummy sweet dish, which he thoroughly enjoyed. And that's exactly what I wanted, after all :)
Thursday, October 22, 2009
Oh What a Lovely Sunday Morning!

One Sunday morning, we woke up, stretched and yawned in our bed. There was a soft pitter patter outside and the air was nippy. Sundays are an excuse to relax and treat ourselves to a nice breakfast. The other days are mundane with the usual toast or cereal. M had a craving for pies, the ones from Romeo's Pies downstairs in our handy little Forum Plaza. So off we went, wrapping our coats closer, still yawning, and came back home with two piping hot pies. Made some hot frothy coffee, courtesy: the little 'mixer thingy', a gift from my dear MIL. It's like a tiny whisk that runs on batteries and is great for cappuccino.
Mmmm, oven fresh pies, hot coffee, the light
 drizzle outside and Sunday! You know what I mean :)
Wednesday, October 21, 2009
Never judge a pumpkin by its looks!
M probably would say this to someone after he ate the pumpkin kootu I made the other day! He doesn't care much for the poor old plain veggie - the pumpkin. I don't really blame him, see he doesn't cook much and so he cannot do what I mostly do - work out a mental recipe while I look at veggies at the market. To him, it will always be the boring, plain looking, least appetising thing. To me, it's what in season now, fresh, in it's prime of life and cheap! So I was adamant to buy it and make something nice. I made this very very simple kootu (veggies cooked in a lentil and spice gravy) and it changed the way we look at pumpkins!


- 2 cups diced (peeled) pumpkin - any variety. I used kent pumpkin - it's skin is green and has streaks of creamy yellow (see picture, source: www.moraitis.com.au)

- 1 cup cooked toor dal

- 1 tbspn oil
- 1/4 tspn mustard seeds
- a pinch of hing
- a few curry leaves
- 2 red (dry) chillies
- 1/4 tspn turmeric powder
- 1 small onion, sliced
- 1/4 cup grated coconut (can use desiccated coconut as well)
- a small piece of ginger
- 3-4 green chillies
- 1/2 tspn jeera (cumin seeds)
- a handful of fresh green coriander/cilantro
- Microwave (or cook) the pumpkin till soft.
- Meanwhile, grind the ingredients mentioned above into a paste.
- Heat oil in a pot and add all the ingredients for tempering in the order mentioned above.
- Once the onion is cooked, add cooked pumpkin, cooked toor dal and the ground masala paste.
- Add salt to taste and water to adjust consistency. Kootu is generally a fairly thick gravy, so do not add too much water.
- Serve hot with rice and papad.
Monday, October 19, 2009
The Festival of Lights!
The flame danced gently, washing the room with a soft glow. It whispered stories of faith and strength. It was as if it coaxed us to look deep inside ourselves and seek the pure light within...
Sigh! That's the magic of Deepavali. The humble light reminds us of much greater things in life than petty issues like wealth, material possessions and the like.
Yet, the heart refuses to forget the sweets and there's nothing 'light' about those! A sinfully generous dose of sugar and an extravagant use of ghee takes us to 'sweet heaven' almost instantaneously! I made Doodh Pedas (milk based sweet cakes) and 7 cups (no points for guessing the recipe).
Both were pretty easy to make, except I had to stir the 7 cups for quite a bit and I had NOT expected that :) Anyways, they turned out quite well, thank God for that! In fact, mum always says if something is made with a warm heart and good thoughts, it can't go wrong. Plus I had my confidante Ganesha's watchful eyes over me as I stirred and stirred over the hot stove. Exactly like I'd asked him to, he must've sprinkled in some magic sugar of his own :)
I found the recipe for the Pedas on www.showmethecurry.com and it was as easy and delicious as it looked there. Thanks to Hetal & Anuja!

And 'thanks mum' for the 7 cups recipe - 1 cup milk, 1 cup besan (chickpea flour), 1 cup coconut, 1 cup ghee and 3 cups sugar - voila! Although, I used only 2 cups sugar and just a little less than a full cup of ghee. Simply combine everything in a heavy bottomed pan and keep stirring. Work those arms until the whole mixture starts to leave the sides of the pan. Pour into a greased square cake tin and cut into desired shapes. Mine looked like little bricks, rough and rustic, although I would have preferred a smoother finish. Well, who cares anyways...it still promises to take us to sweet heaven, in every single bite!

Thursday, October 15, 2009
Recreated Meal: Missi Roti

I've always struggled with quantity and proportion while cooking. I often tend to make more than enough for the two of us, especially so for rice, dal, sambar, etc. I must admit, M is very cooperative and easy-going, so finishing off the excess over a couple of days hasn't been that big an issue. Still, at times we do get bored and I run out of creative ways to make it appealing - you know, garnish it with something interesting or simply mix everything with a dollop of ghee and lovingly (read cleverly, he he) hand it over to a distracted M as he watches TV...you do run out of these little escapades! And yesterday was one of those days - leftover dal, neither enough for the two of us nor too little to ignore. That's when, thankfully, Missi Roti made a flash appearance in my groaning mind. What a great way to use up that little bit of dal!
- leftover dal - I mean in all its glory, spiced, seasoned and relished yesterday :) It doesn't really matter how much you have, although you'd need at least a cup of it.
- wheat flour or atta
- a little bit of salt to taste
- optional - chopped onion, red chilli powder and chopped coriander. I say optional because, ideally the dal should have all of this, but just in case you want to enhance the flavour.
- Add as much flour as the dal will incorporate and knead into a soft dough. If the dal isn't enough and if you want to make a couple of more rotis, then add some warm water. If you're adding onion, etc, do that now, while you knead.
- Roll into rotis and cook both sides on a hot skillet with a drizzle of ghee.
- Warm 'n' soft missi roti is ready to be served with spicy pickle and yogurt.
Wednesday, October 14, 2009
Monkey See Monkey Do :)
I've been quite busy these past couple of weeks, although I don't really know what I accomplished! But with Deepavali coming soon, I'm kind of excited and busy making some fun stuff to give as gifts. I'm planning to make the sweets/mithai tomorrow and I'll post the recipes if they turn out well :) But for now, it's just a quick post of these recipes I picked from the internet and tried out.
Kothu Parota from showmethecurry.com - this turned out quite well. I did not have the authentic Malay or Kerala Parotas, so I used store-bought chapathis.

The other recipe is for Nan Khatais from Manjula's Kitchen. I tried this with a friend and though we started with a flourish and had a lot of fun it did not end very well. Our baking skills were not at their best and let's just say the nan khatais looked pretty before they went into the oven. But the recipe sounds and looks good and Manjula aunty has loads of great recipes on her website.
So, that's it from me for now. Happy Deepavali everyone!
Kothu Parota from showmethecurry.com - this turned out quite well. I did not have the authentic Malay or Kerala Parotas, so I used store-bought chapathis.

The other recipe is for Nan Khatais from Manjula's Kitchen. I tried this with a friend and though we started with a flourish and had a lot of fun it did not end very well. Our baking skills were not at their best and let's just say the nan khatais looked pretty before they went into the oven. But the recipe sounds and looks good and Manjula aunty has loads of great recipes on her website.

So, that's it from me for now. Happy Deepavali everyone!
Wednesday, October 7, 2009
Herbs 'n' Spice & All Things Nice


The other day, I was out running a few errands and doing some shopping when I saw this at the entrance of a shop - 'Coriander 3 for $1'. Now, if you are an Indian living in Sydney you'll probably share my excitement about this. In my local supermarket I have to pay almost $3 for a bunch. I simply love, love, love fresh coriander. There is something endearing about it. The colour, flavour and smell of this humble herb can add so much more to a dish. I've also heard that it has blood purifying qualities. So all the more reason for me to stock my fridge with lots of fresh coriander. So, I went into this shop with my heart singing a little tune and found to my surprise that there were other herbs there too, all fresh and pretty cheap. So I ended up buying bunches of coriander, mint and dill, making my grocery bag look like as if I ripped it off from a patch of greens.
Back home, I was eager to include all that lush green stuff for lunch. So I decided to make akki rotti (flat, Indian bread) with all the herbs. It turned out really yummy and my kitchen smelt so heavenly!
Here's the recipe -
- 2 cups rice flour
- 1.5 cups chopped finely herbs - coriander, mint and dill
- 2 green chillies, a piece of ginger and tspn of cumin seeds (jeera) - crushed in a mortar and pestle, you could even make a paste in the blender.
- 1 small onion, finely chopped (optional)
- salt to taste
- Combine all the above ingredients in a large bowl and using enough water, make a soft pliable dough.
- Take a fistful of the dough and place it on a piece of baking paper (cut to a medium square or circle). Gently pat it into a fairly thin, round shape. Same as a chapathi, only you'll be using the pressure of your fingers instead of the rolling pin. M likes to call this 'rotti with unique finger print technology' :) Traditionally, a fresh banana/plantain leaf is used as the base and boy! do I miss that! Well, I have to make do with the next best alternative and I find baking paper convenient. You could even use a piece of thick plastic sheet, but with it comes the added challenge of burnt plastic, etc. So I choose to use baking paper and you'll know why in a minute :)
- Heat a skillet/griddle/tawa on medium heat. If yours is non-stick then you don't have to smear any oil on it. Place the baking paper, rotti side down on the hot skillet and wait for a couple of seconds before peeling it off. It comes off easily and you can start patting your next rotti on it.
- Drizzle a little bit of oil/ghee around the rotti as it cooks on the skillet. Turn around and cook on both sides until light brown.
- Serve hot with coconut chutney or chutney pudi and ghee.
Tuesday, September 29, 2009
The Boon called Telecommunication!
 The way the world has advanced, and continues to do so at great speed, is kind of scary! At times I wonder how we managed before the boons of technology were bestowed upon us - like when we had to do all the washing by hand, or when we had to depend on snail-mail to communicate with someone overseas, or when we were anxious about a loved one who was late and there was no mobile phone to contact them. Although, I still do like the charm of handwritten letters and cards :)
Anyways, the reason for this ramble is that I felt like making my dear MIL's 'keerai kozhambu' and all I had to do was pick up my (cordless, see, another example for our clever technology) phone and dial the number to speak to her in the States, that easy! So, we chatted for a bit and she gave me the recipe and I made it for lunch today for the (adequately) impressed M! After all, mum's cooking m
 akes our men all mushy :)
- spinach, 1 large bunch - I used a tray of fresh baby spinach.
- 3-4 cloves garlic
- 1/2 medium onion, roughly chopped/sliced
- 1/2 cup cooked toor dal
- 2 tbspns grated coconut - I did not have fresh coconut so I used desiccated instead
- 1/4 tspn sambar powder or plain chilli powder
- 1 tspn oil - use coconut oil for a more authentic flavour
- 1/4 tspn mustard seeds
- 1/4 tspn cumin seeds (jeera)
- a pinch of hing
- 2 red (dry) chillies
- 1/4 tspn chana dal
- Roughly chop the spinach. If you're using baby spinach like I did, then you don't have to chop it.
- Cook the spinach, garlic and onion together. I did it in the microwave. Let it cool completely.
- Then combine the cooked stuff with cooked toor dal, sambar powder and coconut in a blender. I just pulsed it a couple of times.
- In a saucepan/kadai, heat oil and add all the ingredients for tempering.
- Pour in the spinach and dal mixture and add water to get a sort of flowy gravy consistency.
- Add salt and let simmer for a couple of minutes.
- Keerai Kozhambu is ready to be served with hot rice.
Sunday, September 27, 2009
A basket of fresh corn please!
 I love warm corn on the cob with a just a hint of salt and lime! And the fact that it is low fat makes it an extra special favourite. So, the creamy, fresh corn is a regular resident of my kitchen.
One Sunday afternoon, M & I had the familiar craving for a chatpata (tangy) snack with tea. My pantry wasn't at it's very best, but I did have plenty of corn. So I went looking for corn recipes and found this one at vahrehvah.com. Quick and easy! Good old corn to the rescue :)
I think it'd be great for parties as an appetiser. I guess the patties can be made ahead of time and refrigerated/frozen and all that's left to do is shallow fry or deep fry them when needed. Maybe it could be put on the BBQ as well for a nice smoky flavour, and something to add to the veggie BBQ menu :)
We had ours with tomato ketchup and mayo, but I'm sure it'll taste great with mint & coriander chutney.

Thursday, September 24, 2009
'Having a good wife and rich cabbage soup, seek not other things' - Russian quote.
 Cabbage is an excellent source of Vitamin C. It also contains significant amounts of glutamine, an amino acid which has anti-inflammatory properties. Cabbage can also be included in dieting programs, as it is a negative calorie food. (Source: Wikipedia)
As a kid, cabbage was not one of my favourite things. I remember mum making either cabbage palya (a sort of dry, steamed salad) or cabbage huli/sambar (a sort of lentil stew). Then as I started cooking myself, the unfortunate cabbage was again on my list, as I loathed cutting it! I could never control it. It would just fall apart and spill over my chopping board, unlike other more disciplined vegetables that would stay put and get chopped obediently. However, I did start liking the flavour it had and actually quite started enjoying eating it. I would look at the fresh cabbage in the supermarket and although I'd put it into my shopping basket, the thought of chopping it would always lurk around in my head. But that was until M bought me a shiny extra-long knife! It makes cutting cabbage a breeze. It's also great for melons and pumpkins. Now, see, I know you must be thinking, 'of course, that's stale news!' but for me it was just a very recent discovery :)
So, today I made this very easy cabbage and potato dish. It's very healthy, is mildly spiced and tastes great with rice & dal (lentils) or with chapathis (Indian flat bread).


- 1/2 a cabbage, chopped or sliced, as you like it
- 2 medium potatoes, roughly chopped or sliced
- 1/2 a medium onion, chopped
- 1/2 a medium tomato, chopped
- a small piece of fresh ginger, grated
- 2-3 garlic pods, grated
- 1/2 tbspn ghee (clarified butter) you could even use oil
- mustard seeds, cumin seeds (jeera), fennel seeds (saunf) - 1/4 tspn each
- hing, garam masala, turmeric powder, sugar - a pinch each
- red chilli powder, anardana powder (dry pomegranate), jeera powder - 1/4 tspn each
- salt to taste
- fresh coriander, chopped - to garnish
- Microwave chopped cabbage and potato until cooked.
- Heat ghee/oil in a pan and add mustard seeds. Once they splutter, add jeera, saunf and hing.
- Now add turmeric powder and immediately add chopped onion and saute until the onion is tender.
- Add ginger and garlic and saute for a couple of minutes.
- Add chopped tomato and cook until soft.
- Add steamed cabbage and potato and give it all a good stir.
- Put in the masala powders, salt and sugar and mix well.
- Leave on low heat until most of the moisture is absorbed.
- Garnish with chopped coriander.
For a quick bite at lunch, spread some tomato ketchup and mayo on freshly made chapathis. Place spoonfuls of the prepared cabbage and potato and roll. Easy and delicious. Wash it down with a tall glass of fresh spiced buttermilk, yumm!
Sunday, September 20, 2009
A random medley turned yummy salad
We decided to have a quiet dinner at home on our anniversary. The usual suspects sprang to mind as I mused about the menu, but I wanted to make something else, something special. M nudged me for some Thai/Malay flavours and that got me started. I made a trip to the supermarket and built the menu as I walked through the aisles and here's what we had -
a beautiful, colourful and crunchy salad
Thai green curry with steamed rice
yummy, fresh fruits with custard for dessert
and a bottle of gorgeous red wine
A bunch of red roses and a scented candle made for a perfect romantic dinner :)
The salad, however, was the star of the night. We absolutely loved it! Inspired by the Asian flavours, I made up the dressing myself and it turned out real nice. I'm sure I'm going to make this salad again and again..and again! It's that good. Here's the recipe -
1/2 cup toasted peanuts
1-2 green chillies
a small chunk of ginger
1 small tomato, roughly sliced
1/2 a pack of mixed salad greens
2 carrots, julienned
1 cucumber, julienned
1 small red onion, finely sliced
1 cup crimson seedless grapes, halved
1 tbspn lemon juice
a pinch of sugar
salt to taste
1/2 a bunch of fresh coriander, chopped
Combine the first set of ingredients in a food processor. DO NOT grind to a paste, just pulse it a couple of times to keep it crunchy and coarse.
Combine the second set of ingredients in a salad bowl. To this, add the peanut mixture you just prepared and toss well.
Flavour and garnish with the last set of ingredients.
It's best eaten immediately while it's still fresh and crunchy.
It tasted great with some crispy garlic bread.
a beautiful, colourful and crunchy salad
Thai green curry with steamed rice
yummy, fresh fruits with custard for dessert
and a bottle of gorgeous red wine

A bunch of red roses and a scented candle made for a perfect romantic dinner :)
The salad, however, was the star of the night. We absolutely loved it! Inspired by the Asian flavours, I made up the dressing myself and it turned out real nice. I'm sure I'm going to make this salad again and again..and again! It's that good. Here's the recipe -
1/2 cup toasted peanuts
1-2 green chillies
a small chunk of ginger
1 small tomato, roughly sliced
1/2 a pack of mixed salad greens
2 carrots, julienned
1 cucumber, julienned
1 small red onion, finely sliced
1 cup crimson seedless grapes, halved
1 tbspn lemon juice
a pinch of sugar
salt to taste
1/2 a bunch of fresh coriander, chopped
Combine the first set of ingredients in
 a food processor. DO NOT grind to a paste, just pulse it a couple of times to keep it crunchy and coarse.
Combine the second set of ingredients in a salad bowl. To this, add the peanut mixture you just prepared and toss well.
Flavour and garnish with the last set of ingredients.
It's best eaten immediately while it's still fresh and crunchy.
It tasted great with some crispy garlic bread.
Sunday, August 23, 2009
Mystic India: Ganesha Chathurti

'Vakratunda Mahaakaaya Suryakoti Samaprabha Nirvighnam Kurumedeva Sarva Karyeshu Sarvada'
Mum and dad always taught me to say this little prayer - I've said it before the much feared exams, before I walked into the mantap on my wedding day, before we boarded our first flight overseas...and a million other times, and I know the power of this simple sanskrit shloka (hymn/prayer). It fills me with an immense calm, gives me confidence and spills in an abundance of positive feelings.
The endearing elephant God Ganesha has been my protector, my guide and my confidant. I have the greatest faith in Him. And on this special day, Ganesha Chathurti, I wanted to cook Him a special meal, as He loves to eat!
(You can read some interesting stories at Wikipedia)
Here's what was on the menu -

karjikai/kadubu (sweet)
modak/kozhakatai (sweet)
semiya payasa (sweet porridge)
vadai (deep fried urad dal patties)
ambode (deep fried chana dal patties)
hesarubele kosambri (salad)
kadale usli/sundal (spiced chickpeas)
vangibath (spicy rice with vegetables)
rasam/saaru (lentil soup)
beans palya (mildly flavoured beans)
I am not posting all recipes today simply because there were too many things! I will, however, share the recipe for my favourite, and I'm quite sure, Ganesha's too :)
Karjikai - it's sweet, it's crispy and it's filled with sugary goodness!
- 2 cups fine semolina (chiroti rava)
- 1 cup plain flour (maida)
- 2 tbspn ghee (clarified butter)
- a pinch of salt and turmeric
- oil/ghee for deep frying
- 1 cup grated coconut - use fresh coconut for best results, but you could use desiccated coconut as a substitute
- 3/4 cup sugar
- 1/3 cup mixed nuts - sultanas/raisins, cashews, almonds and pistachio, lightly fried in a tspn of ghee
- 1 tbspn roasted poppy seeds
- 1/4 tspn cardamom powder
- In a bowl combine all the ingredients for the filling and set aside.
- In another large bowl, combine semolina, flour, salt and turmeric and rub in 2 tbspns of ghee.
- Using water, knead into a stiff dough. Be careful not to use too much water.
- Cover with a damp kitchen towel and set aside for about 5 mins.
- Heat oil/ghee in a wok/kadai on medium flame.
- Take small portions of the dough, roll, fill with a spoonful of the filling, fold over into a crescent and seal the edge by pressing with a fork.
- Deep fry until lightly brown.


So, I end my post with a sincere prayer -
"Oh Lord Ganesha, please bless us and watch over us at all times.
Shower the world with peace, good health, happiness and prosperity..."
Friday, August 21, 2009
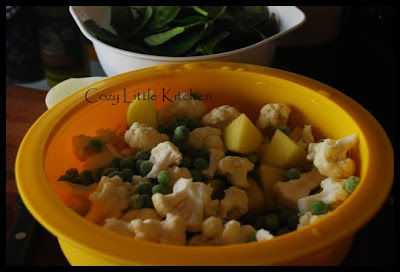
Aloo-Gobi-Matar with Palak
 At times, M & I think there's nothing better than a warm home cooked meal. Just the simple dal, rice and veggies combo, nothing more comforting and fulfilling. Well, yeah, there might be, but I also said 'at times' :-)
Anyways, I made this easy and simple sabji (a vegetable side dish), the all time favourite and much cliched 'Aloo-Gobi'. I also threw in a bit of green peas and a bunch of fresh spinach and, voila, a healthy serve of veggies and greens for lunch.

- 2 medium sized potatoes, cut into chunks
- 1 cup cauliflower florets
- 1/2 cup green peas
- 1 bunch spinach ( I used baby spinach, you can use any variety)
- 1 small onion, finely chopped
- a tspn each of crushed ginger and garlic
- for tempering - 1/2 tspn each of mustard seeds and jeera (cumin), and a pinch of hing (asafoteida)
- for seasoning - turmeric powder, red chilli powder, jeera powder, salt (suit your taste)
- 1 tbspn oil
- fresh green coriander/cilantro, chopped
- Microwave the veggies and spinach till cooked.
- Crackle mustard seeds and jeera in hot oil and add hing.
- Now toss in the chopped onions and ginger & garlic and saute till onions are soft.
- Transfer cooked veggies and spinach and toss it all together.
- Add all the spices and mix gently.
- Garnish with chopped coriander.
- Serve hot with rice, dal and yogurt.

Monday, August 17, 2009
Paw Paw Salad

I'm a vegetarian (yes, I'm proud of it!!) and I have now adapted to the Aussie food scene, quite well I must say. If it's Thai, then there are the veg. green and red curries; if it is burgers, then there is the classic veggie burger option; Italian, hmm well, veg.pasta or pizza; Chinese there's veg. fried rice or Singapore noodles...see? I don't have to starve I can still eat out :) Anyways, there are a few good things that happen because I'm vegetarian (and have limited options) and one such thing was the Paw Paw Salad I had in one of the colourful markets in Darwin and oh! I was in love with it! Fresh, simple flavours and so light, (mmmm) it is an absolute delight. Although, it does give your body that boost of heat ('cos of the green paw paw/papaya and chillies), so make sure you balance it off with something cooling, like cucumbers or buttermilk or coconut water, whatever (or some chilled beer, as M would say!)
I'm not quite sure if paw paw and papaya are the same. It was my first and I really loved it. I haven't tried it at home yet, but I'm sure I will soon. But here's how the lady at the stall made it-
In a big(gish) wooden mortar and pestle, she threw in a handful of roasted peanuts, a few fresh chillies (she asked me how hot I wanted it and believe me I said 'medium', but it was more than my scale of 'medium'!), a few slices of tomato, some salt and lemon juice. Then she lightly crushed everything before adding thinly sliced raw paw paw. She then tossed it all together, scooped it into a container and handed it to a drooling me! And as local musicians sang and played the guitar, I couldn't wait to dig into the heaped box of freshness. It was a complete market feel - the music, the waft of hot food from the stalls, the crunch and the spice of my salad and some crispy pakoras to go with it (and of course, M by my side!).
Sunday, August 9, 2009
Lose it or Lose it?!
So I've been very irritable and low and depressed lately...I've entered a phase where I don't have anything to do, don't have anywhere to go and all I do is eat, slump on the sofa and watch F.R.I.E.N.D.S. Well, what have I to lose? Quite a bit, in fact! (err, the kilos, you got that, right??) I've not been feeling good about myself - I feel bloated, lazy and annoyed. I tried pushing away the blues by emotional eating and only made it worse. Many slices of cake, packets of chips and blocks of chocolate later, I finally regained my senses. I had to stop myself, I had to, had to, had to. And then I remembered The GM diet I'd heard about. If you don't already know what I'm talking about, you can read it here. (I'm vegetarian, hence the variant).
So, a seven-day diet, huh? I can do it, yes I can. And the carrot (hehe) is '5-6 kgs weight loss', wow!
Now, this I need! I was all set, hopped up on the excitement of losing those extra kilos. Ask M, he'll tell you what I'm exactly like when I'm excited about something new, I must go all overboard. Anyways, Day 1 of the diet is 'FRUITS'. We went to the Rapid Creek Sunday Markets yesterday and I was all thrilled looking at the tropical fruits they were selling there. M, as supportive as ever, carried the bags bulging with a musk melon, a honeydew melon and half a watermelon as I looked through the other stalls. (He got a relaxing massage for himself, so...)

Anyways, today is Day 1 of my diet programme. It's all the fruit I can eat. I'm doing well so far, although I did sidestep a little, I had a cup of coffee, oopsie! But, hey, that's probably because I was watching F.R.I.E.N.D.S (well, what's new?) and they were all at the coffeehouse and I was so tempted. Man, they spend way too much time drinking coffee and I blame it on them! Well, never mind, I've been good otherwise. Fruit for brekky, mid morning snack and lunch, so far so good. I am enjoying it as well (see picture and you'll see why - doesn't my plate look yummilicious??) I've started the climb to the healthy food pyramid, one tiny (fruit)step at a time...

Why am I telling you all this? Well, I kind of figured there may be others out there who have been in my shoes before and thought this might be a bit of an encouraging nudge :-)
Plus, knowing that I have all of you saying 'you go girl!' (you will, right?) I have that extra push to get along my promising seven days ahead :-)
Wednesday, August 5, 2009
Mystic India

Upakarma - Avani Avittam
- oṃ bhūr bhuvaḥ svaḥ
- tat savitur vareṇyaṃ
- bhargo devasya dhīmahi
- dhiyo yo naḥ pracodayāt
Well, we're in Darwin at the moment, we could call it 'being away from home'. I have not located the Indian store here yet. But I had this unexpected urge to cook a festival meal which resulted in Project Puje Lunch with Limited Resources! M did not have a new Janivaaram (Holy Thread) here, but he chanted the Gayatri Mantra and although we did not light a lamp or offer flowers, I had my little conversation with God as I cooked. It went like this - "We offer to you all the special things I'm cooking today. We are thankful to you for giving us so much and we're able to cook this meal because of your love and blessings. Please watch over us at all times and be there for us. Err, hope you enjoy the payasam."
The usual festival menu has payasam (sweet porridge), lemon rice and vada (kannada households have ambode while tamil households have vadas) and on festivals that involve a puje (a prayer ceremony that involves offerings such as flowers, sweets, and fruits) no onion or garlic is used in the cooking. Today, I made all the three and some curd rice as well.
So, here's my Project Puje Lunch with Limited Resources -
Cracked wheat/Bourgal Payasam
- cracked wheat, 1/2 cup (soaked for about an hour)
- 2 tspns ghee
- 2 tbspns sultanas/raisins and cashews
- 1 medium tin condensed milk (I used a 400g tin, skimmed version)
- 1 tbspn sugar (optional)
- 1/4 cup milk
- 2 tbspns dessicated coconut
- a pinch of cardamom powder
Add sultanas and cashews and cook on HIGH for 40secs.
Add soaked and drained cracked wheat, pour in the milk and stir well. Cook on HIGH for about 2mins.
Stir in the condensed milk, sugar, coconut and cardamom powder and mix well. Cook on HIGH for about 2mins.
Serve either hot or chilled. Add milk to alter consistency before serving.
Now, ideally I would've used fresh grated coconut and jaggery (molasses) instead of sugar and condensed milk. But you know my situation, don't ya?
Lemon Rice aka Chitranna / Elimicha Saadam
- 1 cup cooked long grain/basmati rice
- juice of one lemon
- 3-4 fresh green/red chillies, slit
- a piece of ginger, grated
- for tempering - mustard seeds, chana dal, urad dal, jeera and a pinch of hing
- 1 tbspn peanuts
- 3 tbspns dessicated coconut
- some chopped coriander/cilantro
- 1 tbspn oil
- 1/2 tspn turmeric powder
- salt to taste and a pinch of sugar
Add chillies and ginger and saute for a few seconds before adding the peanuts. Wait until the peanuts are slightly roasted.
Add dessicated coconut, turmeric powder, salt and a pinch of sugar.
Take off the heat and add the lemon juice and chopped coriander and mix it all well.
Add the rice and gently give it a good mix. Lemon rice is ready to serve.
Again, I would've normally used fresh coconut. By the way, fresh coconut is very much available here in Darwin, but I wasn't enterprising enough to devise a way to break it open and grate it :-) I don't have a hammer and I don't have a food processor here either! And oh, yes, if not for the puje, a whole lot of chopped onion makes this recipe even better.
Now, about the vadas- yes they are the ones that look like doughnuts :-) It is quite a tedious process, at least for an amateur like me. I would struggle with it, even if I had everything that the recipe demanded. But fortunately for me, my brain was in standby mode and I had a packet of instant dosa mix which was a clever substitute, phew that was close! So the vadas were made with minimum fuss and tasted great by the way. In fact, I'm thinking 'dosa mix it is' every time I want to make vadas, or better still I could actually get an instant vada mix, ha (think slapping myself on the head!).
Anyways, that was my story and the moral of the story (as M put it) "where there is a will, there is a way!"
Monday, August 3, 2009
McHomemade Burger!


A healthy alternative, really. I came across a recipe for sweet potato cakes on www.aartilla.blogspot.com. It's a 'sweet' video, one of the many wonderful food episodes she has churned out. Take a look when you have some time, they're amazing!
Anyways, keeping Aarti's recipe as a base, I tweaked around a little bit and made a burger meal out of it, easy peasy. Now, whenever we feel like a burger, I just whip this up in a jiffy and with some Coke and wedges/chips on the side, we can have the whole 'go-out-and-grab-a-burger' experience right at home!
Here's how I adapted the recipe, mainly to suit what I had at home :-) You can do the same too, just stick to the base ingredient, say sweet potato or regular potatoes, and get innovative with the add-ins.
- sweet potato, 1 medium size
- 1/2 cup whole green moong sprouts
- 2 tbspn wheat bran
- 2 tbspn all purpose flour/gram flour/wholemeal flour -whatever you have, just to bind it all together
- ginger, garlic, fresh chillies, fresh coriander/cilantro - ground to a paste, as per taste
- salt to taste & a pinch of sugar
- oil
- slices of onion, tomato, cucumber (any salad really) to serve the burger
- burger rolls
- Cook the sweet potato until soft (I microwaved mine) and peel it once it cools down.
- In a large bowl, put in the sweet potato and mash it with a fork/potato masher.
- To this add all other ingredients and combine until it all comes together and holds well. (I also microwaved the sprouts for just a bit)
- Shape into patties and shallow fry until crisp and brown on a heated skillet.
- Sandwich between sliced burger rolls and serve with ketchup and chips.
Friday, July 24, 2009
Protein Packed Rice
 Paneer & Green Moong Sprouts make this rice dish an ideal source of protein. This is a recipe I whipped up one day. I simply followed my kitchen instincts and this mildly flavoured, wholesome rice ended up on our lunch menu.
You need -
paneer, 1/4 cup, finely diced
green whole moong sprouts, 1/4 cup
basmati rice, 1 cup
2 cups water
2 fresh red/green chillies, slit
a few corns of pepper and 1/4 tspn fennel/saunf
1 tbspn oil
salt to taste
- Wash the rice and keep aside.
- Lightly crush the pepper and fennel to a coarse powder.
- Heat oil and add chillies and the pepper-fennel powder.
- Tip in the paneer and saute lightly.
- Now add the sprouts and saute for a couple of more minutes. I microwaved the sprouts for a couple of minutes, this helped.
- Add rice and fry on low heat until the rice turns an opaque white. Do be gentle, you don't want to crumble the paneer too much.
- Add water and salt to taste. Bring to the boil and then cover and let simmer until the rice is cooked.
- Serve with raita (spiced yogurt) and Indian pickle.
Thursday, July 23, 2009
Posting from sunny Darwin!
We came to Darwin on Sunday as M is working on a short project here. I must admit, although we hadn't expected an awful lot, we were pleasantly surprised! We've been told this is the 'dry' season and so it is not all that hot 'n' humid, well, good for us :-) So, now that explains the long gap between my last post and now. I have started cooking in the super convenient serviced apartment we've been given. It's the first time I'm cooking on an electric stove top and I'm still shaky about the heat settings, but I'll get there. I tried baking brownies the other day and they were a disaster! Well, actually I did manage to salvage whatever I could out of the slab with an almost black crusty top and a gooey, unbaked middle. The rest of it, however, was delicious! After that charring adventure, I haven't really made anything exciting and new, just the same regular kind of home food. We did come across some really nice and interesting places to eat though. The other evening, we went to this nice place on the waterfront. It was a buffet dinner and was quite good. Last night we went to the popular Mindil Markets by the beach and there was an array of stalls selling food from almost all over the world! What a lovely evening it was - tantalising aromas, great music and interesting wares at the craft stalls, and all by the beach as the sun set turning the sky into an orange delight. I did not take many pictures of the food, but will do so next time. Here are just a couple to illustrate my post :-)
More in my next post. Happy weekend!


More in my next post. Happy weekend!


Thursday, July 16, 2009
Friday, July 10, 2009
Weet-Bix quick fix
 Eureka!! Don't you just love it when you whip up new recipes on your own? I'm beaming right now 'cos I figured out what to do with the big box of 'Weet Bix' (blocks of wheat flakes, eaten cereal style with milk) sitting morosely in a dark corner of my kitchen cupboard. The story so far: A couple of months ago, I was doing a course on English Teaching to Adults (CELTA) and as always, there was an excited pre-course shopping spree where I bought brand new pretty stationery, new shoes (well yea-huh!) etc, and the Weet Bix was part of it. 'I need something healthy and quick for breakfast every day' was my reasoning when M raised an eyebrow at the largest pack on the shelf that I had picked up. And, as always with me, that which began with a great flurry, faded away gradually. I might have had it for breakfast precisely two times! So, back to my eureka moment, the other day I wanted to make something light, healthy and quick for lunch and I opened my kitchen cupboard and stood staring at it as if something would talk to me :-) Then I saw the box and thought I'd experiment a little. And the result was quite good! So here's the recipe.
4 blocks of Weet Bix (well, they're nothing but wheat flakes shaped like biscuits. They may be called something else in your local store. See picture.)
1 onion, chopped
a handful of peanuts
1 tbspn desiccated coconut
1 small potato, boiled and lightly mashed
red chilli powder, cumin powder, salt and sugar to taste
1 tbspn oil
Crush the weet bix to get a bowl of flakes. Sprinkle (not pour) water until you slightly wet the flakes. Adding too much water will make it a porridge! You need to get the avalakki/poha/beaten rice effect.
Heat oil in a wok/pan and add chopped onion. Cook till soft.
Add peanuts and desiccated coconut and saute for a while.
Add mashed potato.
Add chilli powder, cumin powder, salt and sugar and mix well.
Tip in the damp wheat flakes and give it all a good mix.
Serve hot.
I noticed that the texture of this dish is very much like avalakki/poha, but it has an interesting touch of wheat. Light, healthy and quick. A huge plus for me is that I can now finish the rest. I'm actually planning to add some more veggies and flavours to it. Maybe I'll also try something sweet, mmmm...Well, one never knows when one will say 'Eureka!'
Thursday, July 2, 2009
Easy Veg Noodles

Eating in and loving it! Last night M said he'd decided we'd go out out for dinner. Well, I can't say I don't know why, 'cos I do know the reason behind the decision! We have been having an overdose of rice 'n' sambhar, courtesy leftovers, and he wanted a break, heheh. Can't really blame him for the pizza craving now, can I? I, on the other hand, was horrified at the thought of a pizza dinner. Why? you ask...because scenes of me huffing 'n' puffing on the treadmill came flashing into my head and an alarm began to shrill, hence the horror :-) So, I quickly made a plan to cook at home and several defensive answers later, he succumbed, yay! I even managed to motivate him to be my sous chef in our 'we're-gonna-cook-noodles' project. So off we went to the store and back we came with some ingredients. This is a recipe that I adapted from a friend's. Anyway, it turned out absolutely yummy and my sous chef, I must say, was very efficient indeed!
We gathered
1 small onion, sliced
some thinly sliced ginger and garlic (as much or as little as you prefer)
2 red (birds eye) chillies chopped
1 large bowl of mixed veggies - we had green bell peppers/capsicum, mushrooms, baby corn, french beans and carrots, all thinly sliced. Omit or add as you wish, you could add broccoli, for example.
some soy sauce, chilli sauce, honey and salt (we didn't really have any specific measure, just added in according to taste. If you're unsure, check taste and adjust accordingly)
Hokkien noodles or any (thick) noodles of your choice
2 tbspns oil
What we did -
Heated oil in a wok and added ginger and garlic and chillies.
Then we put in the sliced onion and sauteed for a while.
Next we added all the sliced veggies and quickly tossed it for a couple of minutes, stir-fry style. We kept the veggies crunchy and didn't cook them till soft.
Then we added in the soy sauce, honey and chilli sauce. (Now, these three things are the stars of the show. They give all the flavour to the dish, so add according to taste. Be generous with the honey and soy but do hold back on the chilli sauce, unless you want dragon breath, which is what happened to M & me, by the way! We were gasping and panting as we ate dinner, but thoroughly enjoyed it anyways.)
Then we added some salt, again only as much as was needed as soy sauce already has salt in it.
Finally, we added the noodles (which my efficient sous chef had prepared as per instructions on the packet) and tossed everything well.
And voila! Our very own, home cooked, veg noodles was ready to be eaten! Oh, by the way, we had forgotten to buy spring onion on our little ingredients shopping trip, but you could garnish it with chopped spring onion if you wish.
I must say, it was great fun cooking together. We laughed and had a wonderful time. Highly recommended :-) It's a great feeling to cook at home and eat a healthy meal. Plus it only cost us about $5, great in these times! So, go on, put on your aprons and chef's hats and cook a meal with someone you love. I assure you, it'll turn out to be a delicious meal filled with love 'n' spice and all things nice :-)
Sunday, June 21, 2009
Besan Ladoo
 Quick Fixes...some recipes were meant to rescue us from our misery - be it a lazy Sunday afternoon when a certain someone has a sweet craving or the jitters when guests arrive, these easy and quick recipes can be a life saver, especially when they don't demand any fancy ingredients. A quick dig in the pantry and you're all set to start. Phew! What a blessing! Well, one such recipe is for Besan Ladoos, quickly made and quickly devoured! I had actually stumbled upon this recipe on a blog a long long time ago, so I don't really remember...but would certainly like to say 'thanks' to that blogger :-) She (I'm most certain it is a 'she') made it so simple -
2 cups besan/kadale hittu (chickpea flour)
1 cup powdered sugar
1/2 cup ghee (clarified butter)
a handful of chopped nuts - cashews, almonds and sultanas
1/4 tspn powdered cardamom
Pour all of the ghee into a heavy bottomed pan/wok and leave on low flame until the ghee dissolves and gets some heat.
Now tip in the chickpea flour (you could sift it before if you wish) and stir well to avoid lumps. Initially it will form into one big lump, but slowly it will start loosening and will finally arrive at a semi liquid consistency, like a thick porridge. Continue to stir on a low flame until the flour is well cooked/roasted in the ghee.
Add the powdered cardamom.
Stir until it turns a nice toasty brown and gives a nice aroma. DO NOT over cook as it will end up in a burnt mess with a very charred flavour.
Take off the heat and allow to cool (it will still be liquidy, which is fine, it will all come together finally). While still a wee bit warm, add the powdered sugar and nuts and mix well. Now take small portions of the mixture and roll into balls. Ideally, the ghee in it should be enough to hold the mixture in a tight ball. I notice that the ladoos tend to hold on to the surface and stick to each other a bit when placed on a plate/box. So I used muffin liners to separate them.
This is great for festivals and poojas as naivedyam (an offering made to God) as well. For M & me, who have a real sweet tooth issue (err), this is easy, delicious and quick!
Tuesday, June 16, 2009
Sweet Corn Vegetable Soup
 On a cold winter's night...
It's quite cold now in Sydney as winter has set in. It has also been raining quite a bit. It's the perfect time and setting to stay indoors, cozy and warm, and gorge on some soulful comfort food. I was totally in the mood for some nice hot soup. 'Tomato? Nah, not tonight, hmmm, pumpkin? Don't think so...how about sweet corn? Yeah!!' - after some self conversation in my head, I decided on sweet corn vegetable soup :) I looked up the net for an easy recipe and found it on www.vahrehvah.com, yup there are some nice 'n' easy recipes there!
sweet corn kernels - 1 cup (the original recipe uses cream corn, but I used the regular canned ones. You could also boil fresh sweet corn at home and slice off the kernels.)
diced carrot - 1/4 cup (I wanted my version of the soup to be chunky, so added quite a bit of veggies, you could decrease the quantity if you wish)
thinly sliced french/string beans - 1/4 cup
vegetable stock - approx 3-4 cups
corn starch - about 2 tbspns, dissolved in about 4 tbspns of water
a dash of vinegar and soy sauce (the original recipes uses rice wine vinegar, I did not have any, so I just used regular white vinegar)
salt & pepper to taste
In a large pot/saucepan, bring together vegetable stock, corn, carrot and beans.
Turn on the heat and bring to the boil. Then, simmer it down and add vinegar and soy sauce.
Let it simmer for a couple of minutes before adding the corn starch paste. This is to thicken the soup, so use according to the consistency you're looking for.
Add salt and pepper to taste. Hold back on the salt until the end as vinegar and soy sauce have some salt content in them and you don't want your soup to be too salty.
Garnish with some chopped spring onion and serve hot with warm, toasted garlic bread.
What could be more comforting than hot home cooked food, a good movie to watch and the company of your beloved? Well, I couldn't have asked for more!
Sunday, June 14, 2009
Idli - Sambhar - Chutney

My parents, my sis, my grandparents and I had gone on a South India tour when I was a kid. It was a long tour, about a week or so I guess. We stayed at hotels at night and travelled and saw places during the day. One of the things I distinctly remember about this trip is breakfast at the hotels. There were so many things that smelt so good and looked even better. I remember I was so tempted to have the big, hot, puffed up puri (deep fried Indian bread) that the people at the next table were having. But mum always said 'eat idlies first and then you can have the puri' and I wrinkled my nose at the plain, dull idlies. Mum was smart, she wanted me to have the healthy, steamed breakfast and not the oily alternative and she knew that my tiny stomach would be full with a couple of idlies! So, there, a promise that was not quite met :-)
Idli - steamed rice and lentil cakes. I guess I wouldn't be wrong if I said it is t
 he one thing most children (and some adults, ahem) would gladly swap for anything else for breakfast! Not one of the favourites exactly, but truly one of the most popular on the Bangalore Breakfast menu. Every restaurant in India that serves South Indian food will definitely have this on their menu. It is served with hot steaming sambhar and coconut chutney and to most people the only appealing factor may be the crispy vadas that accompany it!
But I have to admit, I graduated from my days as a kid into a sensible woman who actually liked idlies as they were healthy and apparently low fat, wow! M, on the other hand, is still the fussy kid when it comes to these humble white fluffies :-)
Still, I made idlies for breakfast yesterday and he gladly ate them, for several reasons maybe - the sambhar was yummy. there was chutney and he was really hungry, period! I did not make vadas though, will make them some time soon.
The recipe as my mom-in-law taught me, who by the way, makes the softest, fluffiest idlies :-)
- 4 measures of uncooked rice
- 1 measure of urad dal (white, split lentils)
- salt to taste
Grind, again separately, into a very smooth batter. A wet grinder works the best, but a food processor/blender/mixer will do the job as well. Be wary of adding too much water while grinding. The batter should be pourable, but not too runny either. A little stiffer than dosa batter, if you know what I mean...
Mix both the batters well in a large container, add salt to taste and leave overnight or for about 8 hours to ferment. Leave the container in a warm place, if possible. Once fermented, the batter should be risen, light and fluffy. This will ensure your idlies turn out soft and fluffy.
Now, grease the idli moulds and pour in the batter. Steam in an idli maker, microwave or a pressure cooker (without the weight). The cooking time will depend on the method you choose. I usually steam mine in a pressure cooker and it takes about 10 - 15 minutes.
Serve hot with sambhar and coconut chutney. I will post the recipe for sambhar soon...
Try this legendary Bangalore Breakfast, but without the prejudice, let's give the idli a fair chance to win!
Thursday, June 11, 2009
Chickpeas & Potatoes in a Tangy Tomato Sauce
 Curry in a hurry!
Once in a blue moon I guess we are allowed one 'canned' sin! I commited mine yesterday...I had a sprained neck and it took great effort to just hold my head on my shoulders! I was in pain and no position soothed me. I knew I could not bear to stand in the kitchen and cook a meal. So, with a comforting voice in my head that said 'it's OK, you can do it this time', I went down to the supermarket and tossed in three cans into my basket and walked back home in relief. Well, so the three cans were the key to my 'easy peasy lunch plan' - canned chickpeas, canned potatoes and canned crushed tomatoes :) I know, I know, my mum or my mum-in-law will probably go tsk, tsk when they read this, but I had a reason! Anyways, although I'm a huge fan of fresh cooking, I still think it's alright to use tinned/canned ingredients. Especially if they are unavailable in certain seasons and of course, if it means it saves time :)
Anyways, so I set out on making lunch and I had it all ready in 15 minutes flat! Hot rice and curry ready for M's lunch.
Here's what I did -
1 can chickpeas (kabul chana)
1 can baby potatoes
1 can crushed tomatoes
1 large onion
2 tbspns ginger garlic paste
1/2 tspn jeera (cumin)
dry masala powders - dhania (coriander) powder, jeera (cumin) powder, turmeric, garam masala powder, red chilli powder - according to taste
2 tbspns ghee (clarified butter)
a pinch of hing (asafotieda)
salt to taste
Chop the onion.
Prepare the potatoes as per instructions on the can and dice them.
Drain the chickpeas and keep aside with the potatoes.
Heat ghee in a pot and add jeera and hing.
Next add chopped onion and saute till soft. Then add ginger garlic paste and saute till the raw smell disappears.
Pour in the crushed tomatoes from the can and add in all the dry masalas and cook for about 5 mins.
Add salt to taste and a pinch of sugar to balance the sourness in the tomatoes.
Bring to a light simmer and tip in the chickpeas and potatoes and let simmer for another 5 mins.
All done! You can garnish it with some fresh coriander if you wish. Serve hot with rice.
Of course, if you are using fresh ingredients, you'll need to soak the chickpeas for atleast 6 hours and pressure cook it with potatoes. As a variation, you could also put in boiled eggs instead and make a tangy egg curry.
And finally, thought I'd just let you know that I chose this option over 'heat & serve' Dal Makhani...so, I did make the better choice, what say you? ;-)
Tuesday, June 9, 2009
Friends, Food and a perfect Cocktail!
 Sangria
It was a phase when M was enthusiastic about learning how to make cocktails. He even bought a book called 'Shaken, classic cocktails-shaken not stirred'! And one fine day, M, along with a friend of ours, decided to make us girls some good homemade cocktails. After a long discussion and everyone suggesting their favourites, they chose to make Sangria (two reasons, we had just had some at a Mexican restaurant and we loved it and it was the simplest in the book!) Anyways, they got out their cocktail kit, shook and stirred and made some really potent Sangria and served it to us with a string of brags and boasts. We thoroughly enjoyed it, the cocktail that is ;-)
Here's the recipe as it appears in the book -
juice of 1 orange
juice of 1 lemon
2 tbsp caster sugar
ice cubes
1 orange, thinly sliced
1 lemon, thinly sliced
1 bottle red wine, chilled
lemonade
Shake the orange and lemon juice with the sugar and transfer to a large bowl or jug.
When the sugar has dissolved, add a few ice cubes, sliced fruit and wine.
Marinate for 1 hour if possible, and then add lemonade to taste and more ice.

I'm sending this to Ria's Let's Celebrate Event.

Subscribe to:
Posts (Atom)